“Burn marks” are a type of flaw in injection molded parts that manifest as a blackened edge near the very end of the cavity-filling process. Air that becomes trapped in the injection mold’s cavities causes burn marks.
As the plastic was pumped into the mold, it compressed the air inside the cavities to the point where diesel fuel ignited. The charred leading edge of the molten plastic is responsible for the black color.
When air is trapped during the injection (or filling) stage of the molding cycle due to flaws in the design of the plastic part or the injection mold, burn scars might result. As a result of the compression, the air temperature rises.
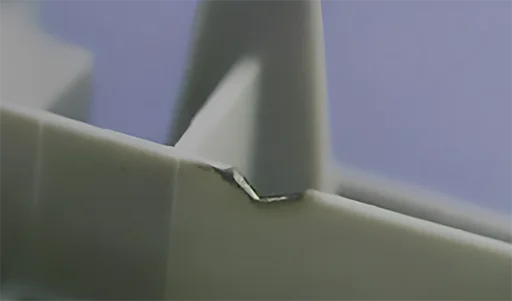
It burns at high enough temperatures, leaving only carbon residue on the component. We refer to those dark scars as burns, as shown in Fig 1 below.
Unfortunately, burn spots in injection molding are more than just an issue in the appeal of the product. Instead, these marks also degrade the material and mold qualities.
As a result of this deterioration, the component’s structural integrity is usually compromised, and the part eventually fails.
These flaws in plastic injection molding can be remedied by a skilled manufacturer before the pieces even reach you.
Also Read: 11 Widely Used Products Made by Injection Molding Today
But how common are they? And what is the impact of burn marks in injection molding? What approaches do professional injection molding service providers use to troubleshoot this defect? Let’s go ahead and analyze burn marks in injection molding in more depth.
The Main Cause of Burn Marks in Injection Molding:
Mold can become a source of burn marks if uncontrolled conditions allow it to grow. The molten material flows in a laminar state when it is injected into the cavity.
The rate at which injection molding is performed picks up, to some extent, disrupting the flow condition. Burn marks are left on the surface of a plastic component whenever it is formed in turbulent conditions.
The injection speed should be slowed down to avoid burn scars and maintain control of the flow condition. Burn marks are fairly easy to develop on plastic molded parts when subjected to high melting temperatures.
Therefore, the back pressure should be lower than 2 MPa, and the screw speed should be lower than 90 RPM. The specialists in injection molding advocate finding a solution to the burning problems in the molded parts.
A prolonged rotational period contributes to the production of excessive frictional heat during the injection molding process. To fix this issue, you can increase the speed of the screw and extend the length of the molding cycle.
It is beneficial to use raw material with a low level of lubrication, and helps reduce back pressure.
The high resin temperature is responsible for transforming the material into charring as it progresses. You can fix this problem by ensuring the heater bands operate correctly. Check the temperature, and if you discover that the melt temperature is too high, adjust it. You can bring it down for more efficient processing.
Because the barrel and the screw aren’t functioning properly, the parts could have a dark tint and striations that look like specs. When we utilize the anti-reverse ring in the molding machines, you may need to replace the barrel and the screw to fix the problem.
It can become a cause of retention, as well as create discoloration and decomposition and melt. Burn marks of a dark brown or black color are produced when molders inject this discolored melt into the mold’s cavity.
Also Read: The Ultimate Guide to Designing, Making, and Maintaining The Die Casting Mold
In this scenario, you can eliminate this problem by cleaning the nozzle screw system well. It would be best if you went with a high-velocity resin. It is recommended that you use a machine with a long diameter and low pressure for the entire process.
Furthermore, the cause of burn marks may be mainly the breaking down of the substance, but they’re still a mystery. This takes place as a result of excessive heating and rapid injection speed.
It may be because of a combination of a high melt temperature and a flow route that is too narrow. The fast speed of the screw affects the material as well and might be the cause of burn marks.
Burn markings are a common problem in injection molding, and one of the primary causes is the excessive heating of the trapped air. After the filling procedure, you can notice some burn marks. It’s possible that the speed was too high for injection molding to work properly. Reduce the pressure and take control of the rate at which the container is filled to find a solution to this problem.
Incorrect venting is another source of air trapping and burn marks at the end of the filling, which can occur when the filling is baked. The injection rate might be slowed down, which could effectively solve this problem. Air can become trapped in the runner system due to the high injection speed and pressure.
Compressing air will generate polymer that will degrade on the surface in the vicinity of the blind spot. One solution would be to install an adequate venting system that would assist in releasing the air trapped inside the tarp.
In fact, they play an extremely significant role in the blind area as well as close to the conclusion of the flow path. The venting size for the crystalline polymer is 0.025 millimeters, while the correct size for the amorphous polymer is 0.038 millimeters.
The size of your nozzle and gate both have a role in producing flaws in your completed products. A nozzle and gate size that is too tiny can result in black streaks appearing in the molded pieces. You can reduce the amount of resin that flows out by opening the mouth of the nozzle or the opening. It’s possible that this will solve the problem.
Failure of mold growth can potentially become the source of numerous issues. It ought to give careful thought to the matter. In this regard, the mold gate type and location are of the utmost importance. You need to make sure that you use the right amount of release agent, and the surface of the cavity in the mold should have a glossy finish.
Suggested: Design Guide for Different Types of Industrial Molds
Another cause of burn marks is the failure of mold, which is one of the primary reasons. Therefore, the functioning of the mold needs to be improved to resolve this issue.
Failure of mold can be caused by several circumstances, including the following:
- Because of releasing agents, mold can block vents in buildings.
- Insufficient capacity for venting the mold.
- Poor design and location, as well as a rapid rate of filling
- Burning can also be caused by excess grease and the breakdown of grease.
- Compression leads to the production of high temperatures, which acts as a gas trap and causes the resin to burn.
To resolve all of these concerns, you need to ensure that the clamping force is modest. There shouldn’t be any obstacles, and the mold ventilation should improve.
Brief Overview of Common Issues Leading to Burn Marks + The Solutions:
| Source of Burn Marks | How It Occurs | The Solution |
| When plastic injection speed is too high | It results in burn marks at the end of the part’s filling | In this situation, the pressure is expected to be too high, which leads to an inability to control the fill rate. You can solve this issue and prevent burn marks in injection molding by lowering the pressure. |
| When resing temperature is too high | It leads to the charring of resin. In this situation, when you enter resin in the melt stream, the charred resin is also molded in the part. | To address this issue, you can resolve it by examining the temperature controls and heater bands. This will ensure that the temperature and heater are calibrated and properly functioning. If not, you should reduce the melting temperature. |
| Due to improper venting | Burn marks can occur near the end of part filling | You can solve this by slowing the injection rate |
| Air trapped in injection cavities or pockets | It results in resin burn marks that destroy the mold | Improper mold construction with limited vents is the main cause of this issue. So it’s better to focus on mold construction quality before using it for part production. |
| When the gate size is too small | It can lead to burning marks in the form of black streaks in the molded part | You need to check if the resin melt flow is too low. If so, increase the flow to solve this issue. |
| When the nozzle size is smaller than it should be | It can cause the production of black streaks in molded parts | You can prevent this issue by opening the nozzle orifice |
| Wearing of screw and barrel | This can cause blacks specs and color striation in the molded part | You can solve this issue by replacing the screw and the barrel with a new one. |
Summing Up:
Whether you’re new to the production sector or have been in the industry for a long, you might be well familiar with the fact that injection-molded parts often have flaws like burn marks.
This defect is a potential source of component deterioration, mold growth, and complete product failure. Even though burn marks are frequent in plastic injection molding, they can be avoided with the right knowledge and by collaborating with the best injection molder.
By referring to the guide above, you can closely analyze the cause of burn marks and keep them from occurring and affecting the final production quality of your product.
Also Read: Why is Mold Fabrication So Hard to Learn?


