Did You Know? Grand View Research‘s report indicates that the global die-casting market was worth $33.94 billion in 2020 and is projected to experience a compound annual growth rate (CAGR) of 6.2% from 2021 to 2028. Notably, die casting mold manufacturing finds widespread use in multiple industries, encompassing automotive, aerospace, electronics, and consumer goods, among others.
This standard manufacturing method allows for the accurate and precise production of metal parts in huge quantities. The popularity of die casting as a manufacturing method can be attributed to its numerous advantages, such as rapid cycle times, shape adaptability, strength-to-weight solid ratios, and sleek, consistent surfaces.
This article will discuss designing, manufacturing, and die casting mold maintenance a die-casting mold in detail.
7 Steps Guide for Designing Die Casting Mold
Designing a die-casting mold is an essential step in the die-casting process. The die casting mold design must consider several factors, such as the part’s geometry, the die-casting machine’s specifications, and the material used. Here are the steps involved in designing a die-casting mold:
1. Part Design:
The first step is to create a 3D model of the part that needs to be produced. This model should include all the necessary features, such as draft angles, fillets, and undercuts.
2. Gate and Runner Design:
The gate and runner system is crucial in controlling the flow of molten metal into the mold cavity. The design should ensure the metal flows evenly throughout the cavity, minimizing turbulence and potential defects.
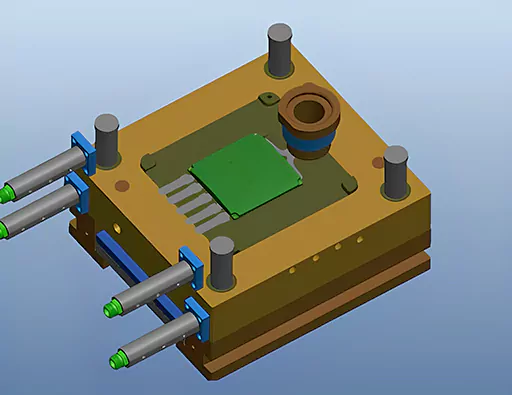
3. Mold Base Design:
The mold base provides the foundation for the mold and should be designed to meet the machine’s specifications. The mold base includes the cavities, core, ejector pins, and other necessary components.
4. Cooling System Design:
The cooling system is critical in regulating the mold temperature and the part during the casting process. The cooling channels should be strategically placed to ensure uniform cooling and minimize cycle time.
5. Venting and Ejection System Design:
The mold should be designed with proper venting and ejection systems to allow the metal to flow into the cavity and remove the part from the mold after casting.
6. Draft Analysis:
The die casting mold design should undergo a draft analysis to ensure there are no undercuts or areas where the part may get stuck in the mold.
7. Simulation:
Finally, the die casting mold design should be simulated using computer-aided engineering (CAE) software to verify that it will perform as expected during the casting process.
How to Make a Die Casting Mold?
Die casting is a way to make things by forcing molten metal into a mold cavity while the pressure is high. In die casting, the mold is a very important part that affects the quality and accuracy of the final product. In this article, we’ll talk in-depth about how to make a die-casting mold.
Figure Out the Design of the Part
The first step in die casting mold-making process a die-casting mold is figuring out the part’s design. This is done using CAD software to make a 3D model of the part. The part’s design should be optimized for the die-casting process, considering the material’s properties, the shape of the part, and other factors.
Choose the Design of the Mold
Once the part’s design is done, the next step is to design the mold. This means choosing the type of mold, the number of cavities, and the runner and gate system. Die casting and the shape of the part should be considered in the die casting mold-making process.
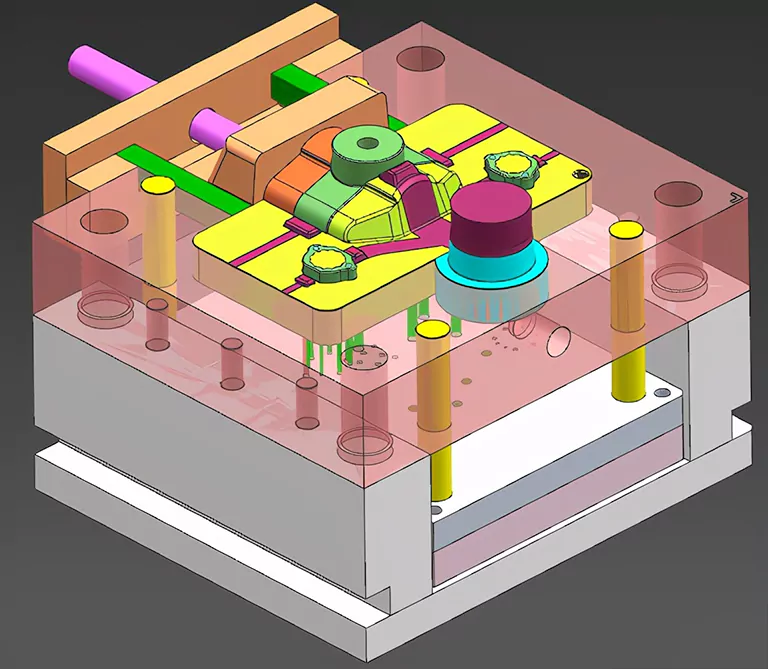
Make a Design for the Mold
The next step is to make the mold design now that the mold design has been chosen. This is done by using CAD software to make a 3D model of the mold. The die casting mold design should be best for the part’s design and consider the material’s properties, the shape of the part, and other factors.
Design the Inserts for the Mold
After the mold design is finished, the next step is to design the mold inserts. This is done using CAD software to make a 3D model of the inserts. The inserts should be made to fit perfectly into the mold and be the best fit for the design of the part and the die-casting process.
Make the Inserts for the Molds
Now that the mold inserts have been planned, the next step is to make them. This is done by making the inserts out of steel or other materials with CNC machines. The mold inserts should be machined to fit the part design and the die-casting process as closely as possible.
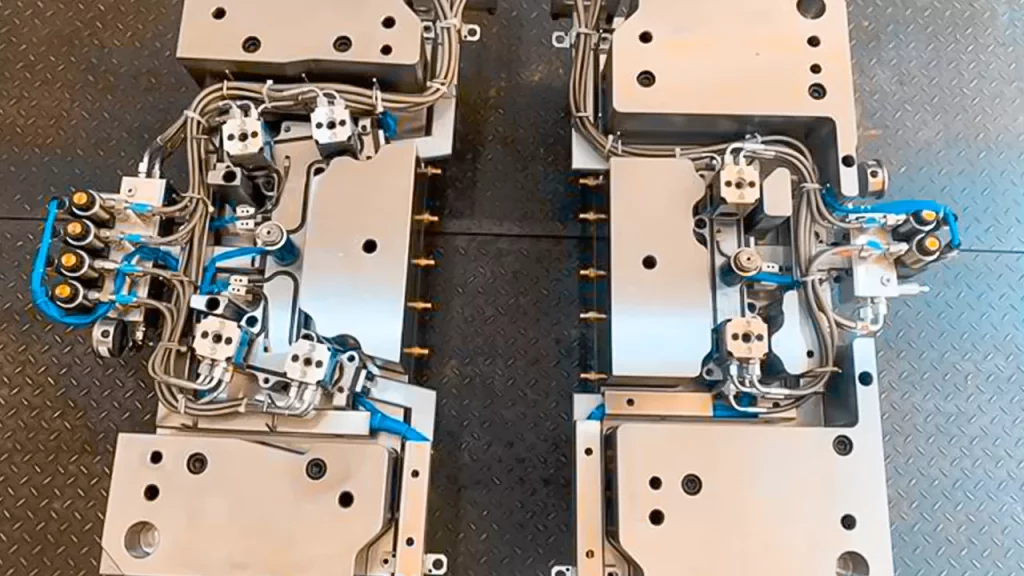
Put the Mold Together
After the mold inserts are done, the mold has to be put together. This means putting the inserts in the mold base and ensuring they stay there. Put the mold carefully to ensure that the final product is accurate and consistent.
Check the Mold
After putting the mold together, the next step is to test it. This means during the die casting mold-making process, create a test part with the mold to ensure it works well and makes parts that meet the requirements. Any problems during the test product should be dealt with and fixed.
Make the Mold Just Right
The last step is to fine-tune the mold after you’ve tried it out. This means making any changes to the mold’s design or machining needed to make the mold work best for the part design and the die-casting process. The mold should be fine-tuned to always make parts that meet the requirements.
Die Casting Mold Maintenance Methods:
Die-casting molds are an important part of the manufacturing process because they shape the molten metal into the shape of the finished product. Die-casting molds must be handled properly to ensure they work well and efficiently. Here is a complete guide on die-casting mold maintenance:
Please clean up the mold often:
It’s important to clean it so debris or residue doesn’t build up. A wire brush, compressed air, or a mild solvent can be used to clean.
Check for damage to the mold:
If you check the mold often, you can see if there is any damage or wear and tear, like mold cracks or chips. Any damage should be fixed immediately to stop more damage and keep the mold quality high.
Lubricate the mold:
The mold must be properly lubricated to ensure it works smoothly and well. You can avoid the buildup by spreading the lubricant evenly and wiping it off after each use.
Check the temperature of the mold:
Temperature is a key factor in the quality of the finished product. Depending on the material being cast, cooling channels or heaters can be used to keep the right temperature.
Replace worn parts:
Since molds are used repeatedly, some parts may wear out faster. These parts should be changed immediately to avoid hurting the mold or the quality of the product.
Store the mold:
To prevent any compromise to the product quality, it is important to store it in a dry and clean location when not in use, as this will prevent the accumulation of moisture or contaminants.
Do regular maintenance:
In addition to the steps above, it’s important to keep the mold in good shape by doing regular die casting mold maintenance. This can include checking for problems, cleaning, lubricating, and replacing worn parts.
Conclusion:
Designing, die casting mold making process, and maintaining a die-casting mold is a complex process that requires careful consideration of the part design, material properties, and die-casting process. Each process requires careful consideration, evaluation, and proper management to ensure high-quality die-casting mold manufacturing.
So whether you’re planning to master this manufacturing method or invest in it for your business’s product manufacturing – this detailed article will help you understand everything you need to know about die-casting mold.


