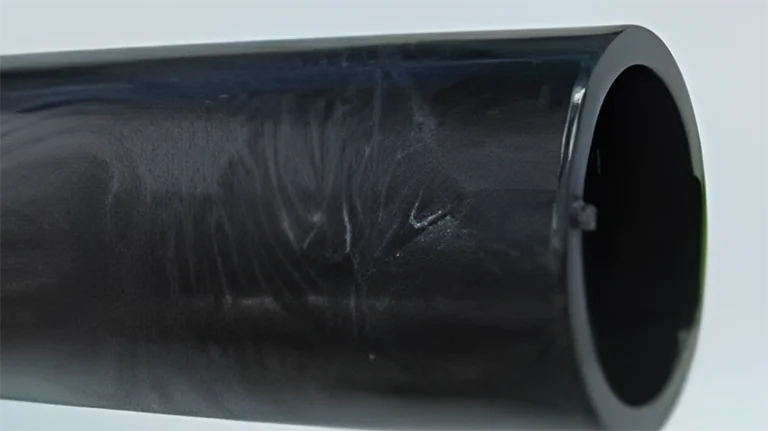
Jetting occurs in a molded component when molten material is injected into the mold cavity and starts solidifying before it fills the cavity. It is a type of distortion caused by this premature solidification.
Furthermore, jetting is frequently visible as a squiggly line on the surface of the final component, typically leading from the original injection gate. When an injection molded part has jetting defect, it will automatically become weaker due to the defect’s flow pattern.
If you’re looking for a way to identify this common plastic injection molding defect and solve it in time, this guide will take you through the defect, its identification, and troubleshooting methods. So keep reading to learn all about jetting in injection molding and how you can keep it from affecting the quality of your final product.
Also Read: What Causes Ejected Mark In Injection Molded Parts & How Can You Solve It?
Causes or Affects Jetting in a Plastic Part:
When producing a plastic part, there can be many processes that, if not monitored and conducted properly, can lead to jetting in the plastic part. According to a simulation experiment of jetting in injection molding held using a finite volume method, here are some specific injection molding process considerations that often lead to or affect jetting in part:
- If the force of inertia is stronger than the force of viscosity at the melt front, jetting will happen. When the viscosity exceeds the inertial force, the jetting changes to buckling and then to the old sequence filling.
- The location of the gate is the most important thing for jetting. Jetting can happen when the gate faces straight into the cavity and is far enough away from the mold wall.
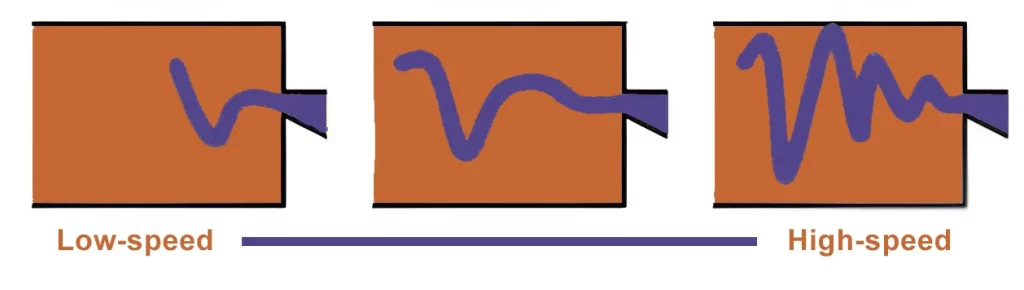
- The injection speed has a big effect on jetting and bending. When the injection speed is high, the length of the jet and how often it swings are both longer.
- In the processing temperature range, the melt temperature doesn’t have much of an effect on the length of the jet, but a high melt temperature makes the jet move less often and makes the buckling diameter bigger.
Identifying Jetting in a Plastic Part:
Identifying jetting in an injection molded part involves a systematic approach to observing and analyzing the molded parts.
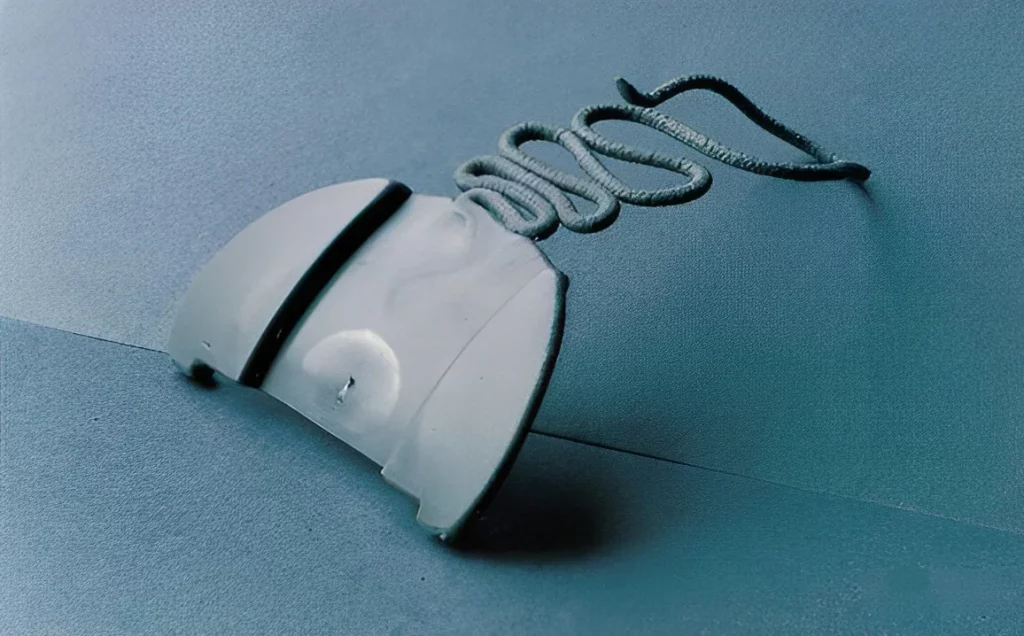
Jetting in injection molding occurs when a high-velocity stream of molten plastic shoots out from the mold during the injection process, resulting in undesirable surface defects. Below is an image that shows how jetting in injection molded part looks like:
While it is an injection molding defect that can occur due to improper mold design and gate positioning, it is important to identify it in time and solve it before it impacts the overall quality of the plastic product.
Steps to identify jetting in injection molding
1. First, you should carefully examine the surface of the molded parts, looking for any obvious flaws or anomalies such as streaks, lines, or distortions. Pay attention to the spots where the plastic flow either changes direction or runs into impediments.
2. Pay particular attention to any components with sharp corners or edges, as this is where jetting is most likely to occur due to the quick change in flow direction in these places.
3. Now analyze the surface quality of the molded pieces in their entirety. It is important to keep an eye out for indicators of jetting, such as an uneven texture, roughness, or waviness in the material.
4. Take careful measurements of the key dimensions of the molded parts, paying particular attention to the places that are likely to jet. When comparing the dimensions that were measured to the specifications of the design, you can discover any discrepancies that were produced by jetting.
5. Examine the many process parameters of the injection molding procedure, such as the injection speed, the melt temperature, the mold temperature, and the cooling time. Evaluate the possibility that any of these elements, such as high injection speed or insufficient cooling time, could contribute to the formation of jets.
6. When inspecting the mold, you should look for potential problems that could lead to jetting. These problems include poor gate design, inadequate ventilation, worn-out or damaged mold surfaces, etc.
7. Now analyze the plastic substance that is being injected into the molds. While doing this analysis, pay attention to the melt flow rate, the viscosity, and the material’s compatibility with the surface of the mold. The likelihood of jetting can be increased by using materials that are incompatible with one another or by using a viscosity that is too high.
8. If you find jetting in injection molded parts, it’s important to perform troubleshooting to determine the underlying reason. You can modify the injection parameters, the temperature of the mold, or the gate placements to maximize the flow and reduce the impacts of jetting (explained descriptively below).
9. Another way to mimic the plastic flow within the mold cavity is by using software designed for injection molding simulation. This makes it easier to visualize any possible jetting issues and guides adjustments to the procedure.
10. Ultimately, recording the observations, analyses, and improvements performed to deal with jetting is important. This paperwork will act as a reference for any later production runs, and it will help prevent or minimize jetting in any molding procedures that follow.
By following these detailed steps and conducting a thorough analysis, it is possible to identify and address jetting in injection molding, ensuring the production of high-quality parts.
Also Read: Why Is Cutting Fluid Important for Effective CNC Machining? Let’s Explore!
Troubleshooting Jetting in Injection Molding:
Solution#1 Increasing the Gate Size
In injection molding, one way to fix a problem with the flow is to look at the size and shape of the gate. Start by figuring out if you can change the size of the gate.
Changing the gate size can help eliminate flow problems, depending on the shape and size of the product. If you can, choose a gate that is short and wide. This will help the molten plastic run in a more controlled and even way.
Also, consider using a fan-shaped or angled gate design, as these are very effective at reducing problems with jetting. Choosing the right size and shape for the gate makes it much less likely that jetting will happen during the injection molding process.
Solution#2: Changing the Gate Location
When injection casting, checking the location of the gate is another way to find and fix problems. Additionally, jetting occurs when the liquid resin is pushing out with force, and this problem worsens in locations with more open space.
However, you can stop jetting by ensuring that the plastic from the gate rapidly contacts a wall or surface inside the mold. So, consider checking to see if you can move the gate to a place where the resin can quickly hit a wall or surface.
Even if you can’t move the gate, you can get a similar effect by putting a needle or wall inside the mold hole to stop the resin flow. Jetting can be reduced or stopped by changing the flow direction and encouraging collisions inside the mold.
Solution#3: Reducing Injection Speed
Another solution to mitigate jetting in injection molding is to lower the injection speed settings, specifically through the gate. This can be accomplished using a multi-stage injection approach rather than reducing the overall injection speed.
The likelihood of jetting can be significantly reduced by controlling the speed at which the molten plastic passes through the gate. Implementing a multi-stage injection process allows precise control over the flow rate during the critical stage when the plastic enters the mold cavity through the gate.
Also Read: Mold Core: What It Is and How Is It Different From a Mold Cavity
Moreover, slowing down the injection speed, specifically at the gate, enables better regulation of the pressure and velocity of the molten plastic. This will minimize the occurrence of jetting and result in smoother, more consistent flow throughout the molding process.
Experimenting with different injection speed settings and employing a multi-stage injection technique provides an effective strategy to address and alleviate jetting issues in injection molding.
Solution#4: Reducing Resin Viscosity
Reducing the viscosity of the resin you use for plastic part production can also help troubleshoot jetting in part. Some effective ways to reduce the viscosity include:
Raise Resin Temperature: By increasing the temperature of the resin, you can lower its viscosity. This allows the resin to flow more easily during the injection process. Raising the resin temperature within the recommended operating range makes the molten plastic less prone to jetting.
Raise Mold Temperature: Elevating the mold temperature can also reduce resin viscosity. The increased heat in the mold helps to maintain the resin in a more fluid state, improving flowability and minimizing the chances of jetting occurring.
Changing to a High Fluidity Grade: For this, you can switch to a resin grade with higher fluidity or lower viscosity. Some resin grades are specifically designed to have better flow characteristics, ensuring smoother injection and reducing the likelihood of jetting defects.
Solution#5: Increasing the Holding Pressure
By increasing the holding pressure, you can make up for and maybe even hide the shooting problem. It is important to look at the choices for the holding pressure and make sure they are right for the injection molding application.
If the holding pressure is too low, the molten plastic might not be kept inside the mold cavity well enough, which can cause jetting flaws. Adjusting the holding pressure to a higher level can help keep a better balance between the injection speed and hollow pressure, which can reduce jetting.
But it’s important to carefully adjust the holding pressure within the acceptable range to avoid problems like flashes or parts that don’t fit together right. Systematically increasing the holding pressure while monitoring the results can help you find the best setting to deal with jetting.
—-
Still have questions? Connect with our skilled manufacturers at Prototool.


